Conversion Tracking Methods
- Postback URL Method
- Conversion Pixel Method
- Conversion Pixel Guide
- Postback URL Guide
- AppsFlyer Postback Integration
- Adjust Postback Integration
- Troubleshooting and common mistakes
Postback URL
What is it?
Postback URL is a simple URL with added parameters that is called whenever a conversion takes place.
It is used in 3rd-party tracking systems. The call is made from the system's servers when a certain event occurs, and we do not receive the user agent + user ip.
How is it used?
A postback URL is a server-to-server tracking method that records conversions without relying on cookies or pixels. It is triggered when a user completes a target action such as a purchase, registration, or app install.
-
Create your click URL and add the
[CLICK_ID]macro to it. The platform will automatically replace this macro with a unique click identifier at the moment the ad is served. -
Install the postback URL provided by the platform into your tracking system. Make sure your tracking system is configured to pass back the same
[CLICK_ID]value when a conversion occurs. -
When a user converts, your tracking system calls the postback URL with the original
[CLICK_ID]— the platform receives it and records the conversion against the correct click.
Examples
Postback URL: https://conversions.smartyads.com/postback?type=campaign&id=14270&cid=18999&clid=[CLICK_ID]
Global Postback URL: https://conversions.smartyads.com/postback?type=global&uid=14270&clid=[CLICK_ID]
How the CLICK_ID is formed: {node_id}-{md5 hash of: creativeId + timestamp}-{hidden userId}
Conversion Pixel
What is it?
Conversion pixel is a piece of code that is provided to advertisers to place on a website landing page. It allows to track and report on the actions of users who visit their page after viewing or clicking on an ad. The conversion pixel is an HTML-wrapped link to our conversion server. The conversion is expected to be inserted into the advert site, resulting in a call from the end user's device, and we get his user agent + ip.
How is it used?
A conversion pixel is a small piece of HTML code that you place on your website — typically on a thank-you page or confirmation screen that a user reaches after completing a target action. It allows the platform to track conversions from users who viewed or clicked on your ad.
-
Get the conversion pixel code from the platform and place it on the page that represents a completed conversion on your site.
-
Add the
[CLICK_ID]macro to your click URL in the platform. If your website or CMS supports dynamic macro replacement, configure it to pass the[CLICK_ID]value through to the pixel as well, this ensures the most accurate attribution. -
When a user who previously clicked your ad reaches the conversion page or event, the pixel fires and the platform records the conversion.
Examples
Conversion Pixel: <script src="https://conversions.smartyads.com/conversion?type=campaign&id=14270&cid=18999&clid=[CLICK_ID]"></script>
Global Comversion Pixel: <script src="https://conversions.smartyads.com/conversion?type=global&uid=14270&clid=[CLICK_ID]"></script>
Conversion Tracking Guide
Tracking conversions is essential for evaluating the success of your ad campaigns. In our DSP platform, you can track user actions—such as purchases, sign-ups, or any other valuable interactions on your website—using one of two supported methods:
- Conversion Pixel (browser-based tracking)
- Postback URL (server-to-server tracking)
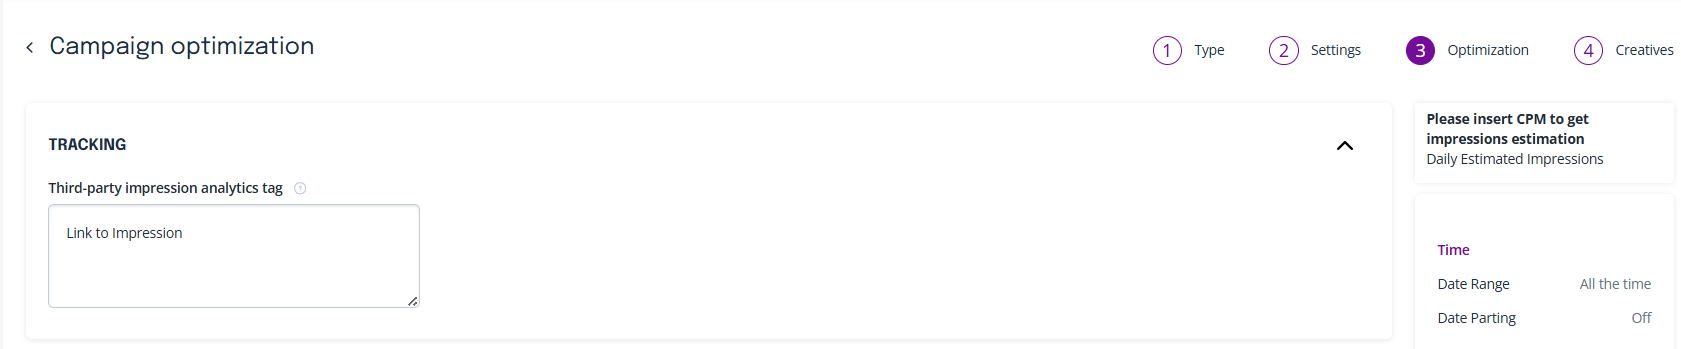
You can configure both options in the Tracking section on the Campaign Optimization page of your campaign setup.
Conversion Pixel
A Conversion Pixel is a piece of HTML code you place on a web page that represents a conversion (e.g., a thank-you or confirmation page). When a user reaches the conversion event, the pixel sends a signal to our DSP to log the conversion.
Use this method if you have access to your website’s HTML and prefer a quick, browser-based setup without additional server configurations.
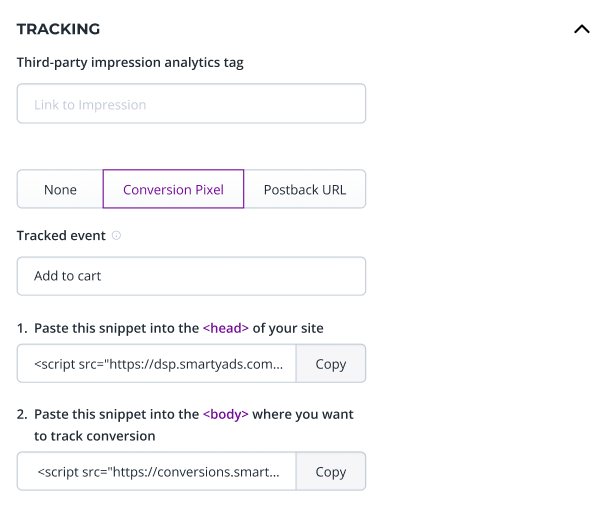
How to set up a Conversion Pixel
-
Go to your Campaign Optimization -> Tracking section.
-
Choose the ‘Conversion Pixel’ option.
-
Enter the name of the event in the ‘Tracked Event’ field (e.g., “Add to Cart” or “Signup Confirmation”).
-
Copy the generated pixel scripts by clicking on the ‘Copy’ button and paste them into your website’s code:
a. The first script should be put in the
<head>of your site. Example:<script id="" text="" charset="" type="text/javascript" src="https://dsp.smartyads.com/clid.js"></script>b. The second script should be put in the exact place where you want to track conversion. Example:
<script src="https://conversions.smartyads.com/conversion?type=campaign&clid=[CLICK_ID]&id=12345&cid=12345"></script> -
Paste these scripts into your website page based on the requirements. The data will start flowing, and the number of pixels firing will be displayed in the ‘Conversion’ column on the ‘Campaigns’ page.
Example: Adding script to the <head>
<!DOCTYPE html>
<html lang="en">
<head>
  ...
  <script id="smartyads-clickid" type="text/javascript" src="https://dsp.smartyads.com/clid.js" charset="utf-8"></script>
  ...
</head>
<body>
  <!-- SmartyShop website content -->
</body>
</html>
Example: Adding script to the <body>
Example of placing the script to track adding an item to the cart:
<body>
  ...
  <button id="addToCartBtn">Add to Cart</button>
  <script>
    document.getElementById('addToCartBtn').addEventListener('click', function() {
      var pixel = document.createElement('script');
      pixel.src = "https://conversions.smartyads.com/conversion?type=campaign&clid=[CLICK_ID]&id=12345&cid=54321";
      document.body.appendChild(pixel);
    });
  </script>
  ...
</body>
</html>
Example of placing the script to track the opening of the ‘Checkout’ page:
<body>
  ...
  <h1>Checkout</h1>
  <p>Review your items and complete your purchase.</p>
  <script>
    window.addEventListener('load', function() {
      var pixel = document.createElement('script');
      pixel.src = "https://conversions.smartyads.com/conversion?type=campaign&clid=[CLICK_ID]&id=12345&cid=54321";
      document.body.appendChild(pixel);
    });
  </script>
  ...
</body>
</html>
Postback URL
Postback tracking — also known as server-to-server (S2S) tracking — is a highly reliable method for measuring user actions and conversions. Unlike browser-based tracking methods such as cookies or scripts, postbacks communicate directly between servers, making them more resilient to ad blockers, browser restrictions, and privacy limitations.
In the SmartyAds DSP, postback tracking relies on the [CLICK_ID] macro within the Click URL. Each ad click generates a unique click ID, which is captured by a third-party tracking system and later returned to SmartyAds via a Postback URL. When a user performs a desired action on the advertiser’s website (for example, a purchase, sign-up, or registration), the third-party tracking system sends a server-to-server postback to SmartyAds. This ensures accurate conversion reporting and reliable attribution.
General Overview
The goal of the DSP platform is to receive the postback call with the changed [CLICK_ID]. The 3rd-party system receives an event with the changed [CLICK_ID] and calls our Postback URL. For that, the advert has to take our postback URL and set it for all events that he wants to track inside the used 3rd-party system. The detailed flow:
-
A Click URL (tracking link) is added to the creative.
This link includes a required tracking parameter - the[CLICK_ID], which identifies each ad click and is essential for postback tracking. Do not be afraid if you forgot to add the parameter to the Click URL — we automatically add it to each tracking link. -
User click and redirect flow.
When a user clicks an ad, they are redirected through the Click URL, which captures click data (including the click ID), and then forwards them to the advertiser’s landing page. -
Conversion event on the advertiser’s site.
When a conversion occurs — such as a purchase, form submission, or subscription — an event triggers on the advertiser’s site. This event sends conversion data, including the stored click ID, to the 3rd-party tracking system. -
Matching and postback.
The 3rd-party tracking platform receives the conversion data, matches it to the initial click event using the click ID, and attributes the conversion correctly. The 3rd-party system calls the Postback URL with the[CLICK_ID]value and sends the data back to SmartyAds via the postback link generated in the DSP interface.
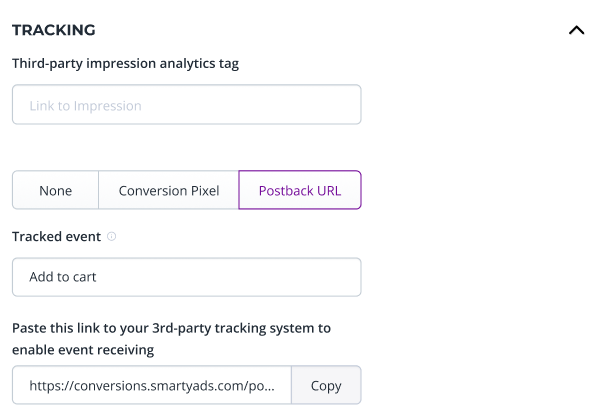
How to set up a Postback URL
-
Go to your campaign’s Campaign Optimization -> Tracking section.
-
Choose the ‘Postback URL’ option.
-
Enter the name of the event in the ‘Tracked Event’ field (e.g., “Add to Cart” or “Signup Confirmation”).
-
Copy the generated Postback URL.
a. Example:https://conversions.smartyads.com/postback?type=campaign&id=12345&cid=12345&clid=[CLICK_ID] -
Paste the copied postback link to the 3rd-party tracking system for the chosen conversion tracking events.
-
Ensure the automatic replacement of the
[CLICK_ID]with the ID captured during the initial click. This ID must then be passed back to us when the conversion occurs.
Note: Ensure the [CLICK_ID] passed back matches the one issued during the original ad click. This ensures the conversion is correctly attributed.
Important Notes
- Only one method can be chosen per conversion event.
- Always test your tracking after setup to ensure conversions are being registered correctly.
- Use the [CLICK_ID] macro only if you're tracking from click-based attribution sources.
AppsFlyer Postback Integration
-
When integrating AppsFlyer with SmartyAds, you do not need to activate the Postback URL on the Campaign Optimization page. Most of the integration work is performed directly in the AppsFlyer interface. At the final step of the setup, you will simply paste the AppsFlyer links into the Click URL and Third-party impression analytics tag fields in SmartyAds.
-
To begin, connect your mobile application to the AppsFlyer platform. Follow the official AppsFlyer documentation on how to Add an app to AppsFlyer.
-
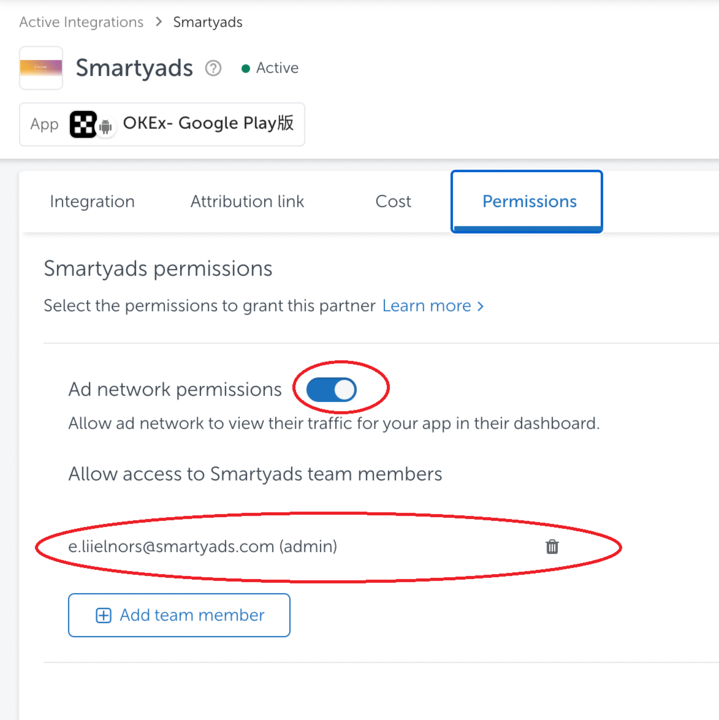
Enable the SmartyAds partner in AppsFlyer using the process described in their Partner activation/deactivation guide. For the integration to function correctly, open: Active Integrations → Smartyads → Permissions and enable the Ad network permissions toggle.
-
Copy the AppsFlyer links for your tracking and paste them into the SmartyAds DSP admin panel:
- Log into the AppsFlyer dashboard.
- Go to My Apps (top-right corner).

- Search for the relevant App ID and open the app.
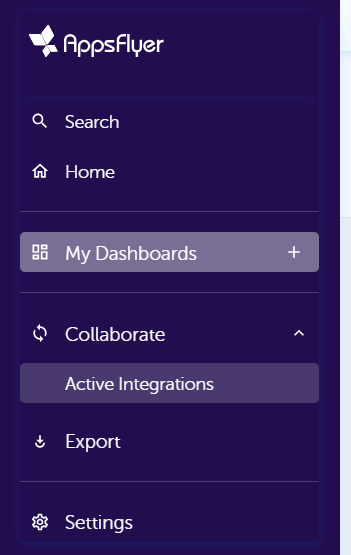
- Navigate to Collaborate → Active Integrations.
- Search for ‘Smartyads’ and open the partner configuration.
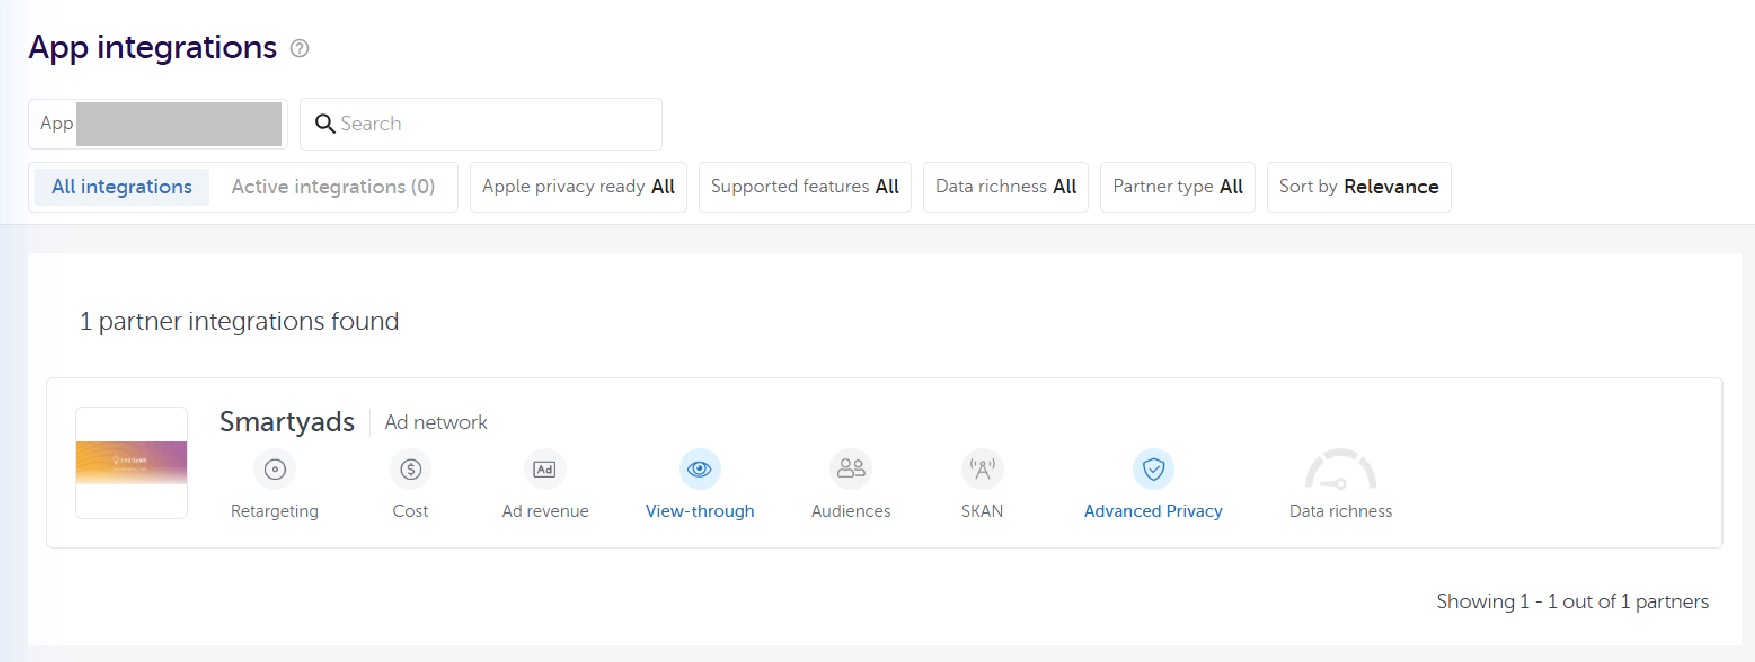
- In the Integration tab, switch Activate Partner to ON.
- Go to the 'Attribution Link' tab to view your attribution links:
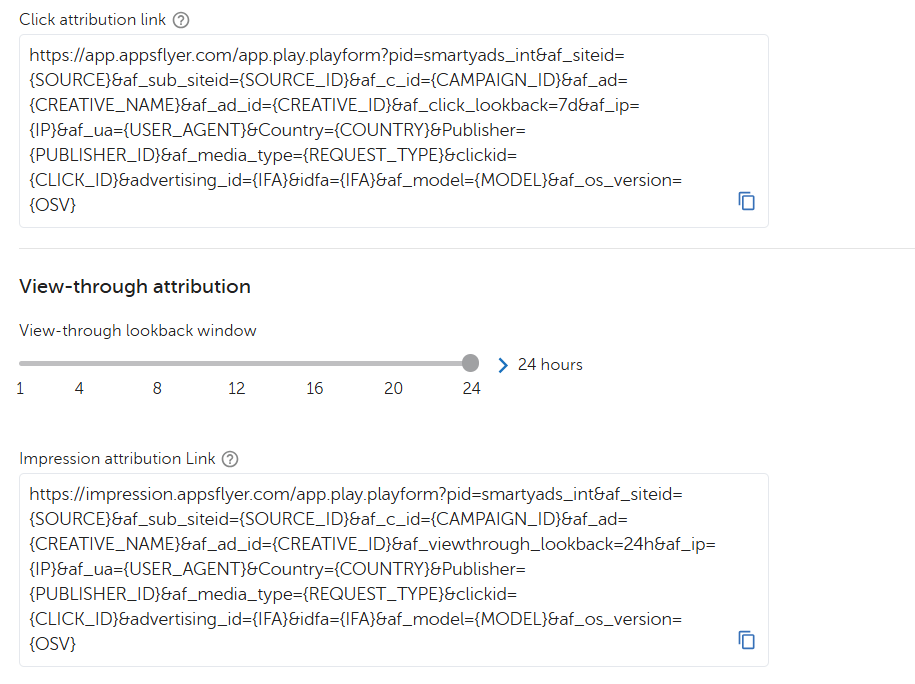
- Сopy the links and add the following info to both links:
- Copy and add the following string to both links:
&af_prt=*af_prt_value*&c=*c_value* - Swap the values:
*af_prt_value*with your Partner Id. The Partner Id value can be found on the Account & Profile page of the AppsFlyer.**c_value*with the name of the tracked Campaign. The Campaign Name can be found in My Dashboards → Marketing Overview → Campaign Performance table.- Example of the finalized link: https://impression.appsflyer.com/id1231231231?pid=smartyads_int&af_siteid={SOURCE}&af_sub_siteid={SOURCE_ID}&af_c_id={CAMPAIGN_ID}&af_ad={CREATIVE_NAME}&af_ad_id={CREATIVE_ID}&af_viewthrough_lookback=24h&af_ip={IP}&Country={COUNTRY}&Publisher={PUBLISHER_ID}&af_media_type={REQUEST_TYPE}&clickid={CLICK_ID}&advertising_id={IFA}&idfa={IFA}&af_model={MODEL}&af_os_version={OSV}&af_ua={USER_AGENT}&af_prt=smartyads_prt&c=smartyads_c
- Copy and add the following string to both links:
- Paste the final links in the fields:
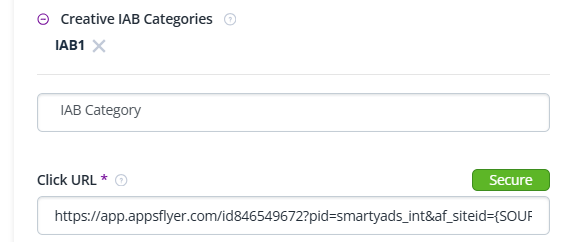
- ‘Click attribution link' into the 'Click URL’ field on the Add/Edit Creative page for the required creatives.

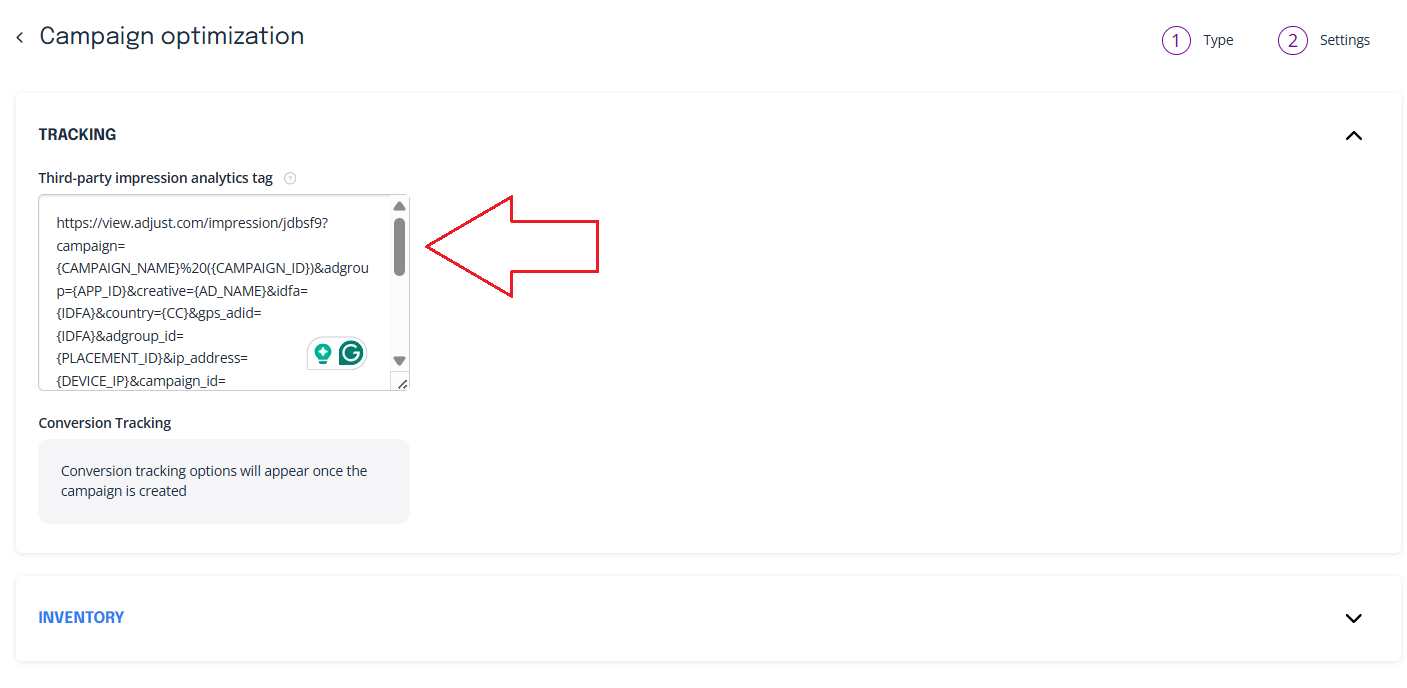
- ‘Impression attribution Link' into the 'Third-party impression analytics tag’ on the Campaign Optimization page for the required campaigns.

- ‘Click attribution link' into the 'Click URL’ field on the Add/Edit Creative page for the required creatives.
- Note: this flow allows tracking only the Install event. For In-App events, check point 3.
Useful links:
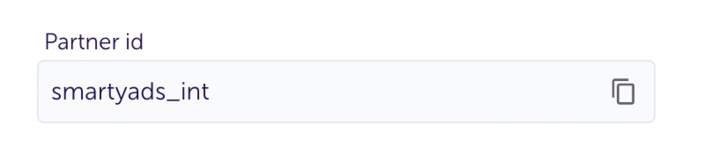
Note for AM: if the partner isn’t added to the dashboard, provide him with the screen with the integration details. The advert should apply the same settings as on the screen.
PID (Partner id) of Smartyads = smartyads_int
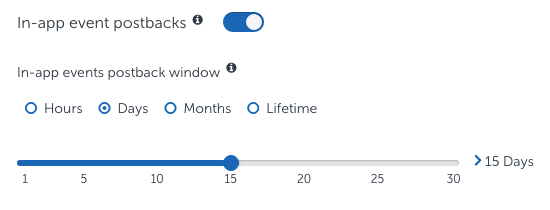
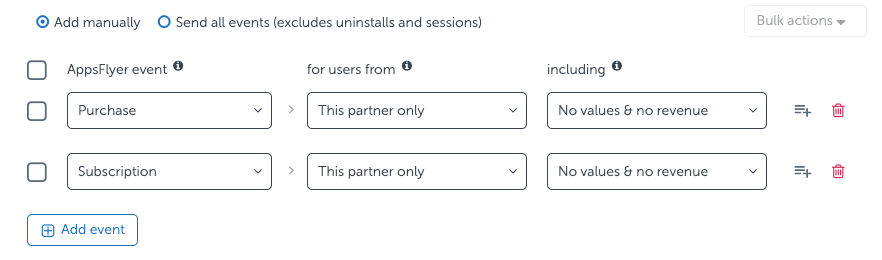
- Create In-App Events in AppsFlyer if you want to track post-install events.
- To enable post-install events, activate the ‘In-app event postbacks’ in the Integration settings as described in the In-app event postback configuration
- Set events and select ‘This partner only' under the 'for users from’ section.
- Сopy the links and add the following info to both links:
- Copy and add the following string to both links:
&af_prt=af_prt_value&c=c_value - Swap the values:
af_prt_valuewith your Partner Id. The Partner Id value can be found on the Account & Profile page of the AppsFlyer.c_valuewith the name of the tracked Campaign. The Campaign Name can be found in My Dashboards → Marketing Overview → Campaign Performance table.
- Example of the finalized link: https://impression.appsflyer.com/id1231231231?pid=smartyads_int&af_siteid={SOURCE}&af_sub_siteid={SOURCE_ID}&af_c_id={CAMPAIGN_ID}&af_ad={CREATIVE_NAME}&af_ad_id={CREATIVE_ID}&af_viewthrough_lookback=24h&af_ip={IP}&Country={COUNTRY}&Publisher={PUBLISHER_ID}&af_media_type={REQUEST_TYPE}&clickid={CLICK_ID}&advertising_id={IFA}&idfa={IFA}&af_model={MODEL}&af_os_version={OSV}&af_ua={USER_AGENT}&af_prt=smartyads_prt&c=smartyads_c
- Copy and add the following string to both links:
- Paste the final links in the fields:
- ‘Click attribution link' into the 'Click URL’ field on the Add/Edit Creative page for the required creatives.
- ‘Impression attribution Link' into the 'Third-party impression analytics tag’ on the Campaign Optimization page for the required campaigns.
- ‘Click attribution link' into the 'Click URL’ field on the Add/Edit Creative page for the required creatives.
- To enable post-install events, activate the ‘In-app event postbacks’ in the Integration settings as described in the In-app event postback configuration
Useful links:
Adjust Postback Integration
- To integrate with SmartyAds using Adjust, an advertiser should be registered in Adjust and have their app(s) integrated with the platform. Follow the official Adjust documentation to register and integrate your app
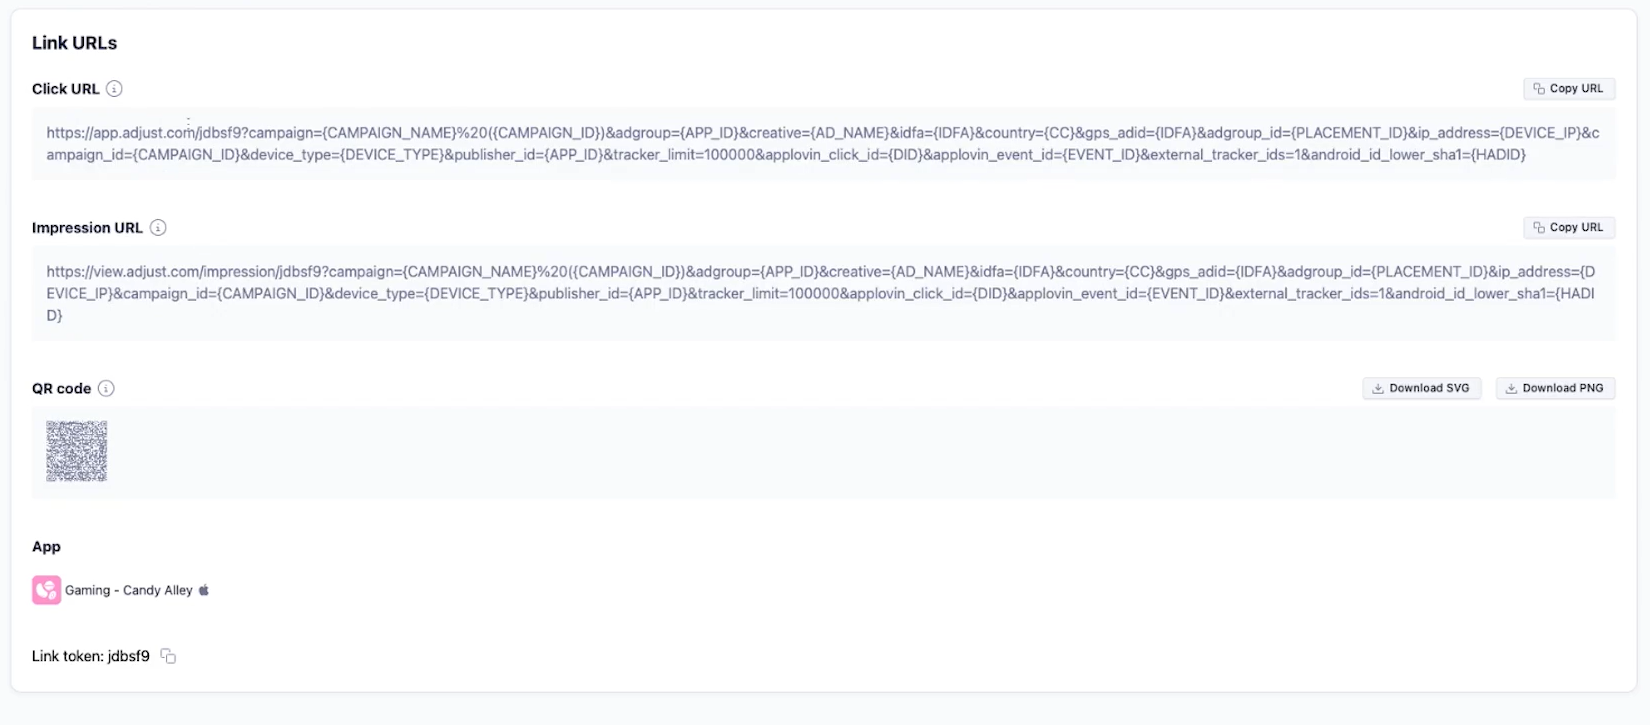
- To implement SmartyAds integration, the Click URL and Impression URL should be created in Adjust and pasted into the SmartyAds campaign settings. Follow the official Adjust guided tour to generate the required links Campaign setup in Campaign Lab | Adjust Help Center. Once you’ve finished, you should copy and save the generated Click URL and Impression URL links (see screen).
- Сopy the Click URL and Impression URL, and add the following macros at the end of both links using the string
&adj_install_callback=[POSTBACK_URL]&adj_cost_type=[COST_TYPE]&adj_cost_amount=[AD_CPM]&adj_cost_currency=[CURRENCY]&cost_id=[CLICK_ID]
a. Example of finalized Click URL:https://app.adjust.com/jdbsf9?campaign={CAMPAIGN_NAME}%20({CAMPAIGN_ID})&adgroup={APP_ID}&creative={AD_NAME}&idfa={IDFA}&country={CC}&gps_adid={IDFA}&adgroup_id={PLACEMENT_ID}&ip_address={DEVICE_IP}&campaign_id={CAMPAIGN_ID}&device_type={DEVICE_TYPE}&publisher_id={APP_ID}&tracker_limit=100000&applovin_click_id={ID}&applovin_event_id={EVENT_ID}&external_tracker_ids=1&android_id_lower_sha1={HAID}&adj_install_callback=[POSTBACK_URL]&adj_cost_type=[COST_TYPE]&adj_cost_amount=[AD_CPM]&adj_cost_currency=[CURRENCY]&cost_id=[CLICK_ID]
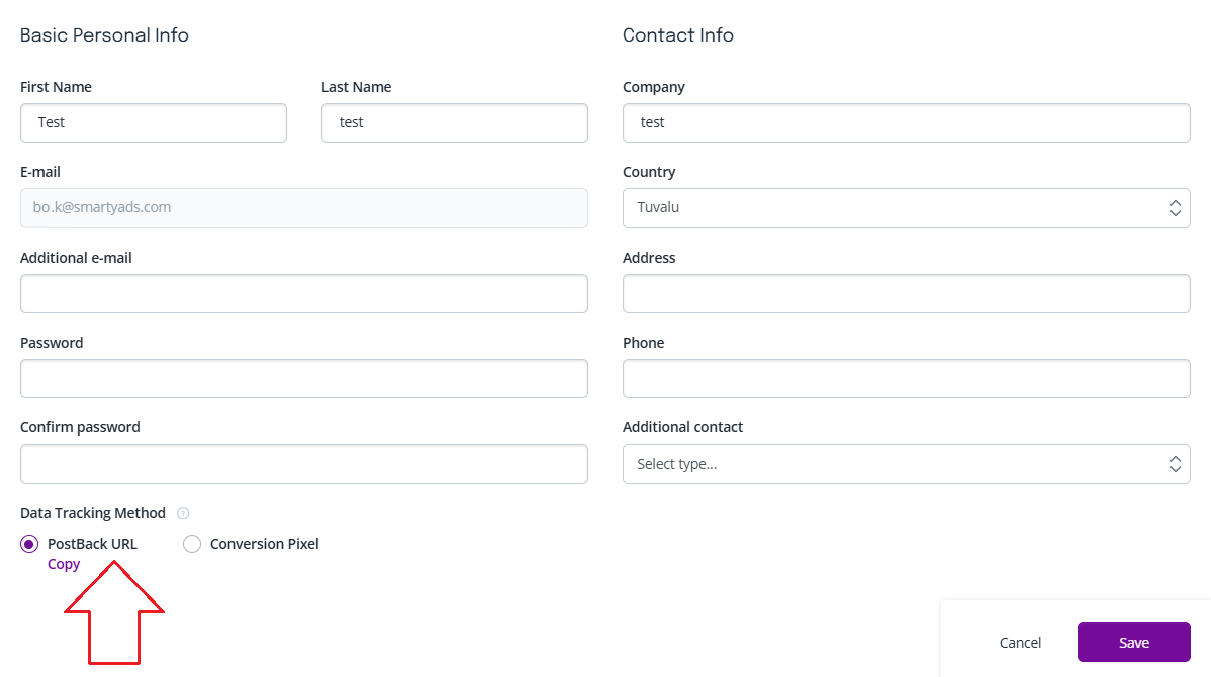
b. Example of finalized Impression URL:https://view.adjust.com/impression/jdbsf9?campaign={CAMPAIGN_NAME}%20({CAMPAIGN_ID})&adgroup={APP_ID}&creative={AD_NAME}&idfa={IDFA}&country={CC}&gps_adid={IDFA}&adgroup_id={PLACEMENT_ID}&ip_address={DEVICE_IP}&campaign_id={CAMPAIGN_ID}&device_type={DEVICE_TYPE}&publisher_id={APP_ID}&tracker_limit=100000&applovin_click_id={ID}&applovin_event_id={EVENT_ID}&external_tracker_ids=1&android_id_lower_sha1={HAID}&adj_install_callback=[POSTBACK_URL]&adj_cost_type=[COST_TYPE]&adj_cost_amount=[AD_CPM]&adj_cost_currency=[CURRENCY]&cost_id=[CLICK_ID] - Activate the ‘PostBack URL’ option on the User Profile page of the SmartyAds DSP platform and click ‘Save’. Note: you do not need to copy the URL by clicking the ‘Copy’ button; all attribution is tracked using the Adjust-generated URLs.
- Paste and save the updated Adjust Click and Impression URL in the fields on the SmartyAds DSP platform:
- ‘Click URL' into the 'Click URL’ field on the Add/Edit Creative page for the required creatives.
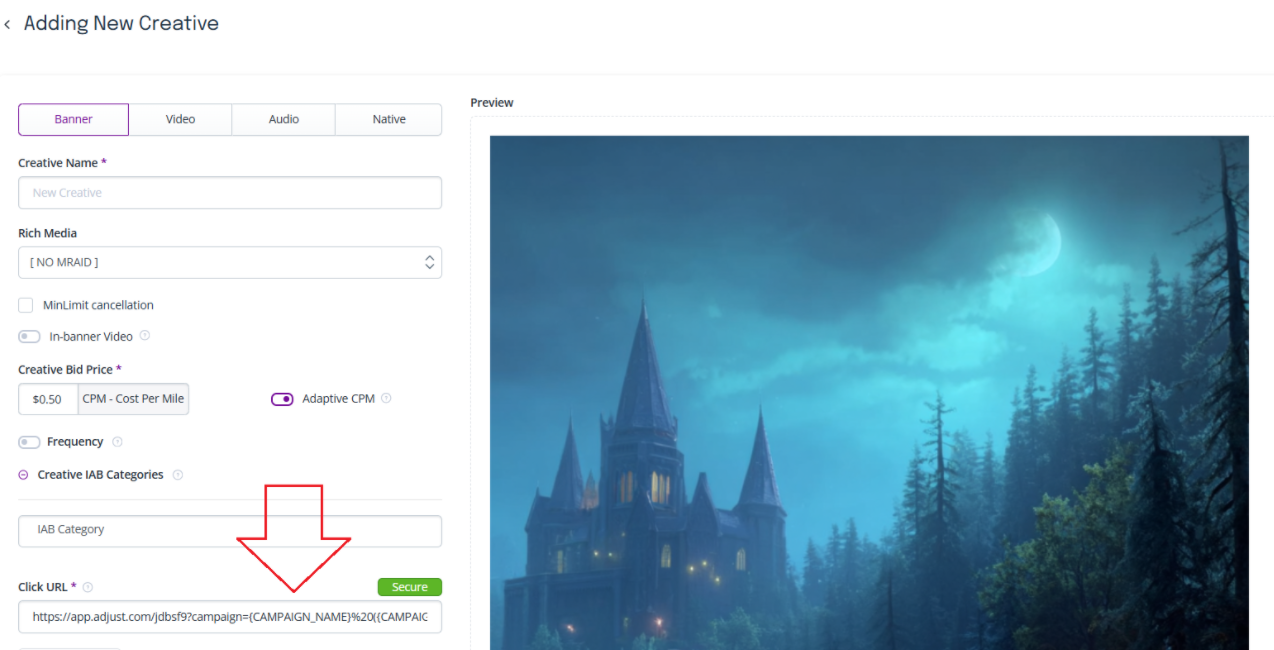
- ‘Impression URL' into the 'Third-party impression analytics tag’ on the Campaign Optimization page for the required campaigns.
- ‘Click URL' into the 'Click URL’ field on the Add/Edit Creative page for the required creatives.
Note: Adjust platform counts all clicks, while SmartyAds DSP counts unique clicks.
Useful links
- Getting started with Adjust | Adjust Help Center
- Set up your app in Adjust | Adjust Help Center
- Campaign setup in Campaign Lab | Adjust Help Center
Troubleshooting and common mistakes
| Issue | Solution |
|---|---|
| Conversions not tracked | Verify pixel/postback is placed correctly and triggered on the right event. |
[CLICK_ID] is missing |
Ensure your ad Click URL includes the [CLICK_ID] macro in the stated form. |
| Pixel fires too early | Place pixel only after confirmation events (not on page load if action is not complete). |
| Postback fails | Check server logs; ensure [CLICK_ID] is correctly captured and substituted. |
| Duplicate conversions | Use logic on your site/server to ensure pixels or postbacks fire only once per user/session. |