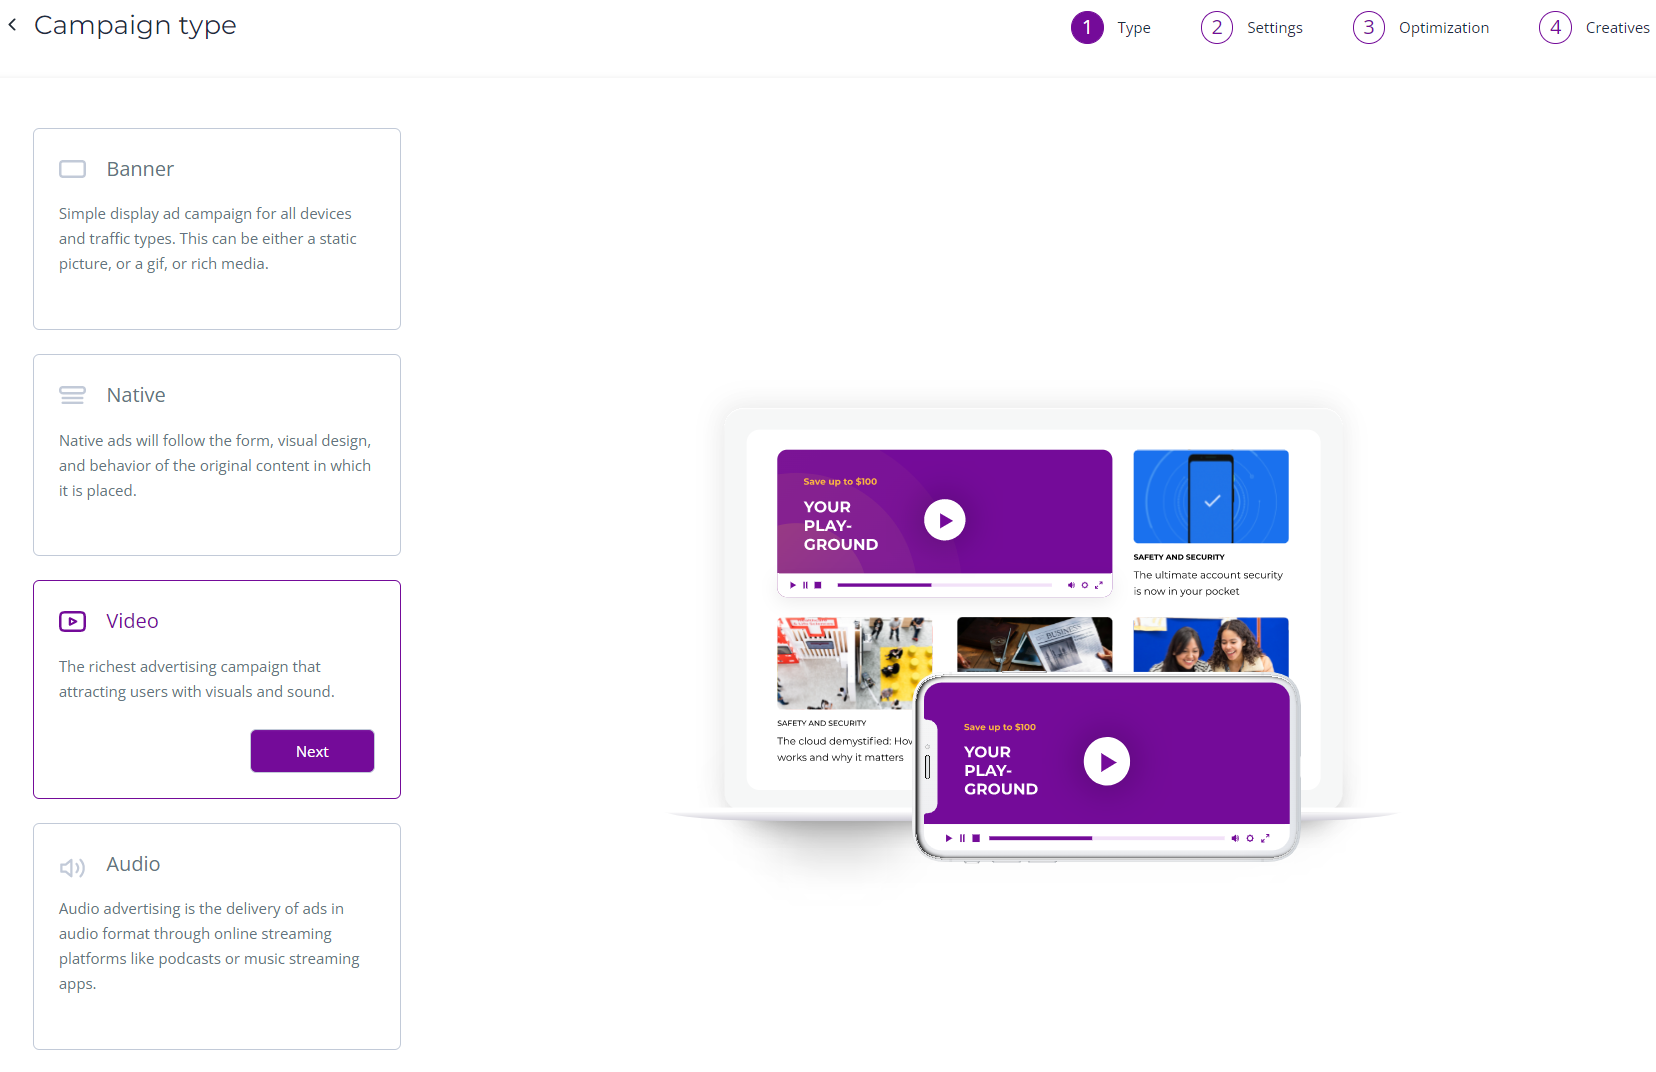
How to Create a Campaign
This section is intended to maintain one of the most important entities
of the system: campaigns. You can create campaigns, connect creatives to
them, start campaigns, and track their main settings.
Note: the process of creating a Banner, Native, Video, or Audio campaigns is described here.
At the Campaigns section, click the [+ Campaign] button.
Choose the type of campaign: banner, native, video, audio. Click [Next].
The Settings step has various settings to determine how and when the campaign should work, what users to target, and
more.
Settings are grouped into areas that you can expand or collapse by clicking an arrow on the right side of an area.
On the right side, you will see the campaign's brief info, including a summary of time and targeting settings.
 Here is what you can configure in each settings area:
Basic
Here you have to set the basic parameters of the campaign:
-
Name to define the campaign among the others.For example, you can use a theme, such as the promoted brand name, traffic type, or the time period when the campaign has to run.
-
Traffic type: Mobile Web for mobile devices that use a web browser to surf the Internet, Desktop Web for personal computers, In-App for mobile devices that use installed applications.
-
Device type: A type of device on which you want to show your ads. CTV stands for Connected TV, such as Apple TV and other smart TVs.
Note: You can select device types only if 'Mobile Web' or 'In App' traffic is selected.
Note: There’s a new device type available for ‘In App’ traffic: Digital out-of-home (or simply DOOH). Read more about its advantages here. -
Top Level Domain – a URL address of the website being advertised.
-
Click Booster: A new feature that helps increase the click-through rate of the campaign. It filters out sources with low CTR as inappropriate, as well as sources with suspiciously high CTR. Utilizing machine learning, Click Booster targets campaigns to the most appropriate sources for maximum effectiveness. Additionally, it analyzes new sources of traffic to discover new effective ways to target the campaign.
Note: In the first 24 hours after the start, Click Booster only collects data for analysis and does not filter sources. Therefore, the effect of Click Booster will be noticeable later as it gathers sufficient data to make informed filtering decisions.
Time
These settings determine the time when the campaign is active.
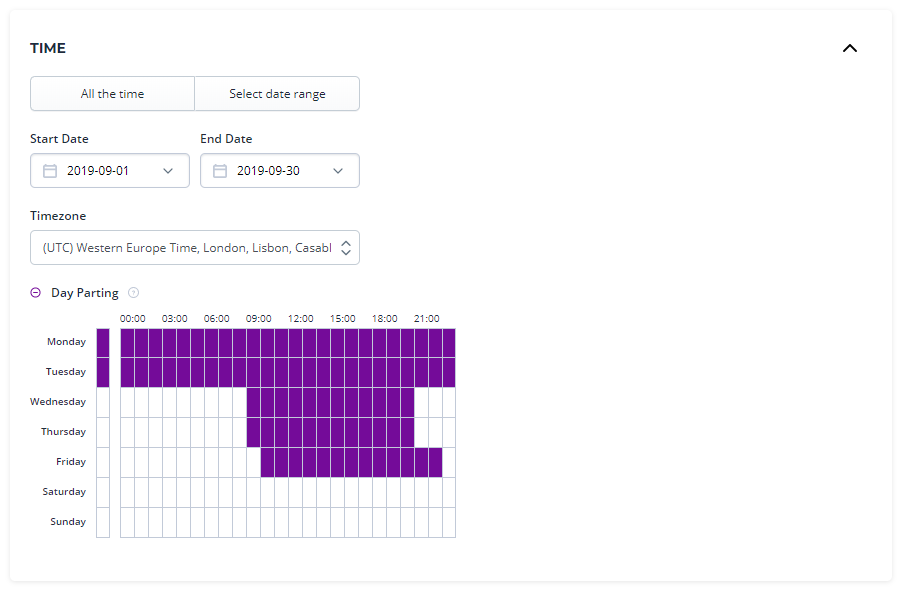
Select 'All the time'
Select 'Select date range'
Select Timezone
Select Day Parting
Targeting
Here are the settings that allow you to determine which users will see the advertising
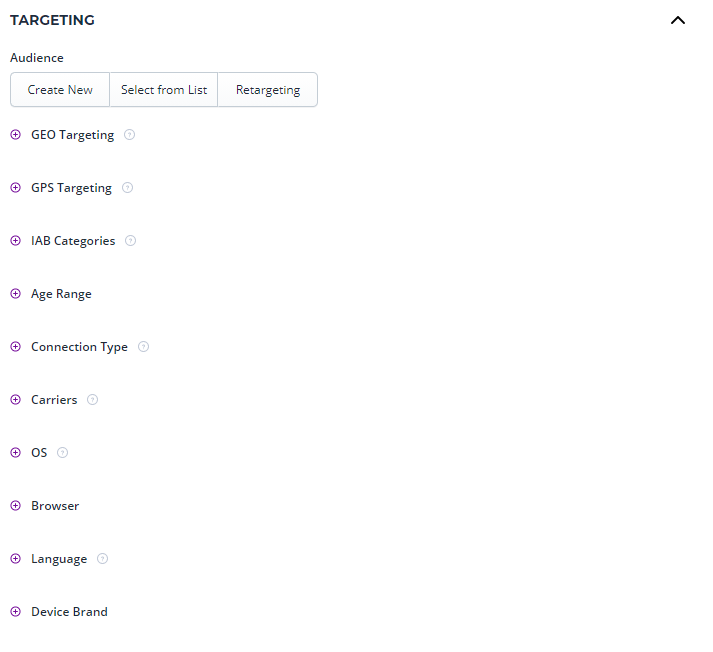
-
Audience: A segment of users that is used in retargeting. You can skip this setting if you don't want to use audiences for your campaign.If you do want to use the audience, you have three options:
-
Click 'Create new' to make the campaign collect its users to a new audience. The users who go through the campaign ( who have seen its creatives and clicked or converted) will be added to the audience. Set the audience name and type of conversion ('click' to collect users who have clicked on the ad; 'conversion' to collect only users who did action considered as conversion; 'pixel' to collect users who visited a webpage with a pixel URL built in it). Set the term for which the audience will work and collect users.
-
Click 'Select from List' to add users who go through this campaign to the audience.
-
If you already have audiences collected from other campaign with our DSP, you can make a retargeting campaign and target users from this audience. To do so, select 'Retargeting' and select the audience from the list. Then, only users belonging to the selected audience will see the ads of this campaign. Read more about audiences here.
-
Geo Targeting – you can select countries and cities to target only users located in these regions. Note: if you have selected the country and its city, the users in other cities of that country will not be targeted.
-
GPS Targeting – use it in case you want to target areas that you can't describe as a list of countries or cities. For example, you can set areas smaller than the country and bigger than the city, or smaller than the city (if you want to target the city district). You can focus the map on a specific country, city, or ZIP Code. To do so, start typing and select the needed location from the suggestions. To create a targeting area, select its type (Include or Exclude) and click on a point on the map. You will see a 10 km circle appear on the map, and a record of that circle will appear above the map. 'Include' areas and points are green, and 'Exclude' areas and points are red.
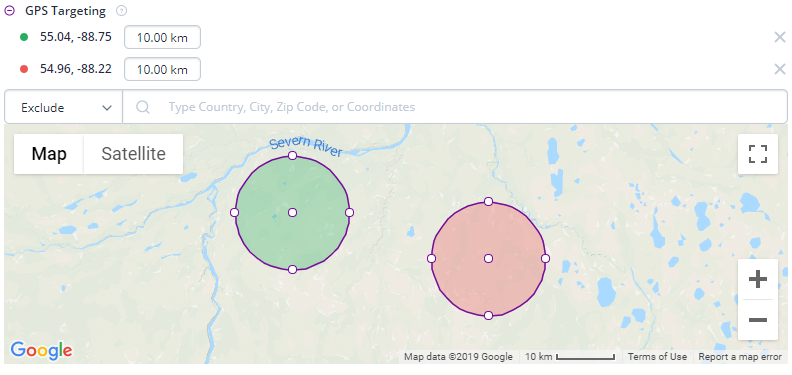
To move a targeting area, drag and drop the circle on the map, holding it by the white point in its center. To resize the coverage area, set its radius in kilometers in the corresponding field or drag the white point on the perimeter of the circle. The radius of the circle must be at least 1 km.
To remove a targeting area, click the 'X' symbol next to its record above the map.
Create these circles until you cover the entire area you want to target.
-
IAB Categories – You can set the advertising categories (according to the Interactive Advertising Bureau classification) that characterize the sources you want to target. This helps to make your targeting more specific and enables your campaign to be matched with publishers and users who are interested in seeing advertising in those categories.
Note: The 'category' field may not always be present in the request. In such cases, try selecting more categories to make your targeting wider and increase the number of impressions. Alternatively, you can choose not to select any categories at all.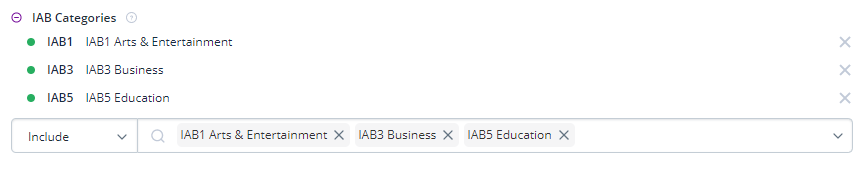 Below is the list of categories available:
IAB1 – Arts & Entertainment
IAB2 – Automotive
IAB3 – Business
IAB4 – Careers
IAB5 – Education
IAB6 – Family & Parenting
IAB7 – Health & Fitness
IAB8 – Food & Drink
IAB9 – Hobbies & Interests
IAB10 – Home & Garden
IAB11 – Law, Gov’t & Politics
IAB12 – News
IAB13 – Personal Finance
IAB14 – Society
IAB15 – Science
IAB16 – Pets
IAB17 – Sports
IAB18 – Style & Fashion
IAB19 – Technology & Computing
IAB20 – Travel
IAB21 – Real Estate
IAB22 – Shopping
IAB23 – Religion & Spirituality - Age Range – set minimum and maximum age allowed.
- Connection Type – select types of connection to the Internet: WiFi, ethernet (cable), or cellular (3g, 4g, or all cellular networks).
- Carriers – here you can select cellular carriers that provide connectivity. Just start typing the name of the carrier and select it from the drop-down list. Repeat typing if you want to target several carriers.
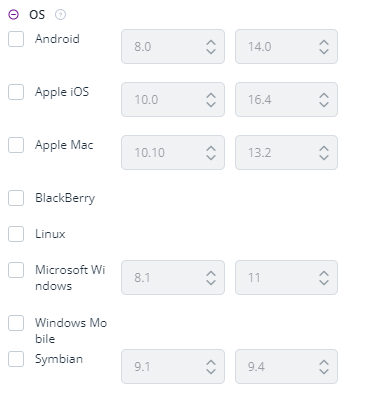
- OS – select operation systems and their versions range.
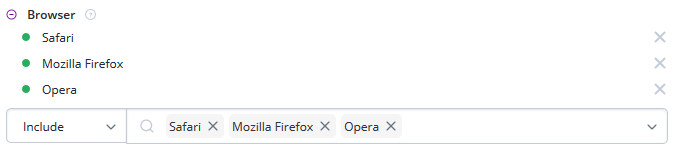
- Browser – select allowed browsers. You can create a list to 'include' or 'exclude' specific browsers. If you choose '
Include', the campaign will target only the selected browsers. If you choose 'Exclude', the campaign will target all
browsers except the selected ones. To remove a browser, click the symbol on the right.
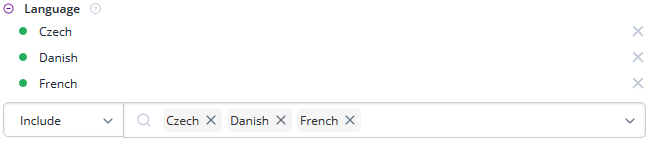
- Language – select the language of the user's device or web browser. You can create a list to 'include' or 'exclude'
specific languages. If you choose 'Include', the campaign will target only users with the selected languages. If you
choose 'Exclude', the campaign will target all languages except the selected ones. To remove a language,
click
 the symbol on the right.
-
Device Brand – select allowed brands. If you choose 'Include', the campaign will target only devices of the selected brands. If you choose 'Exclude', the campaign will target all devices except those of the selected brands. To remove a device brand, click the
symbol on the right.
Contextual Targeting
Here, you can set additional targeting by keywords. To do so, select an existing contextual targeting group or create a new one:
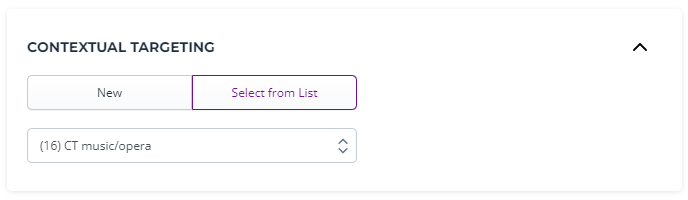
Read more about contextual targeting here.
Filter Lists
In this area, you can set additional filters to make targeting more specific. For example, you can whitelist certain applications and blacklist specific domains and IPs.
To set up a filter, follow these steps:
- Select the 'New' filter, give it a name, and enter a list of values included in the filter (each on a new line). You can also upload a list of values from a CSV or XLS file.
- Alternatively, click 'Select from List' and choose an existing filter from the drop-down list. Specify whether it should be a whitelist (targeting only the specified domains/apps/IPs, etc.) or a blacklist (excluding the specified domains/apps/IPs, etc.).
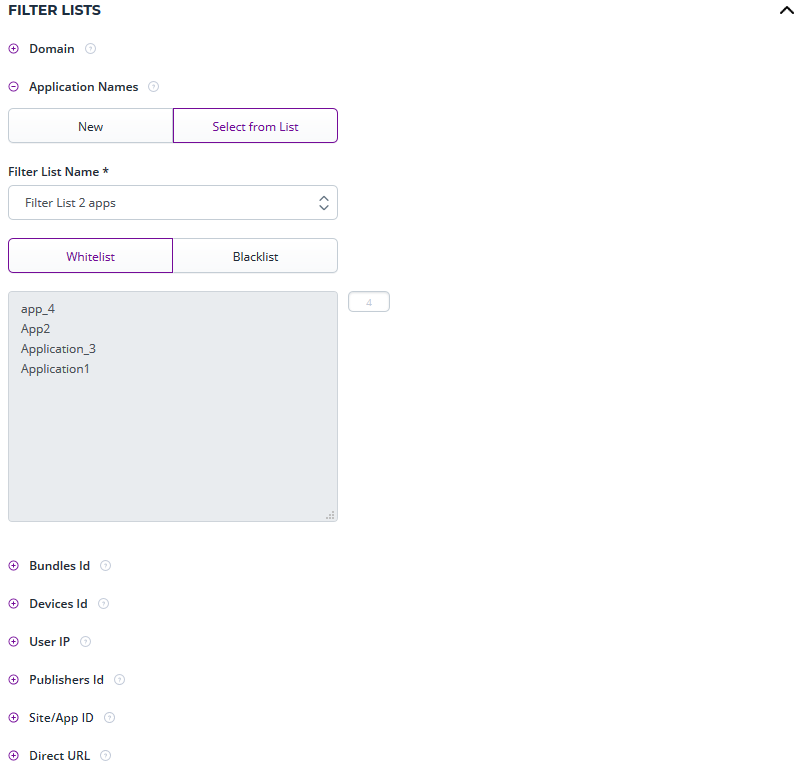
Warning: do not add bundles to filter lists by domains.
Click to read more about filters here.
Budget
Here, you can set two types of budgeting limits: daily limit and total limit. These limits can be measured in the number of impressions and the amount spent in dollars.
For instance, you can configure the campaign to stop bidding on the current day when the daily spend reaches $100 or accumulates 1 million impressions (whichever comes first). Additionally, you can set the campaign to cease bidding entirely after the total spend reaches $3,000 or the campaign's creatives have been shown to 100 million people.
The minimum daily budget limit is $100, and the minimum daily impressions limit is 200,000.
If you don't wish to set a budget or impressions limit, you can select the 'Unlimited' checkbox. Alternatively, if you want to set a common CPM (Cost Per Mille) for all the campaign's creatives, you can choose the 'Use campaign CPM' option. Please note that you can also utilize the 'Adaptive CPM' option, which automatically lowers the CPM when possible, allowing you to save your budget.
Note: we recommend setting the budget limits.
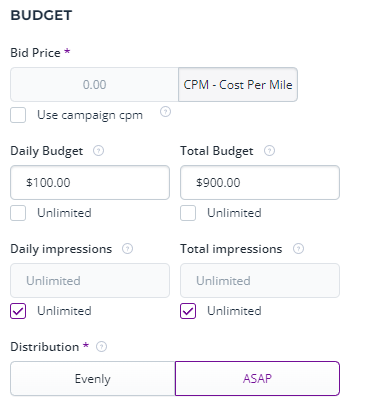
After setting budget limits, go to the Distribution switcher and select how you want to spend the budget: evenly or
as soon as possible.
If you choose 'Evenly', the campaign will distribute its bids evenly over its lifetime, day by day. If you choose ' ASAP', the campaign will bid as quickly as possible.
Once you have finished configuring these settings, click on the 'Next' button located on the right side of the page to proceed to the next step: campaign optimization settings.
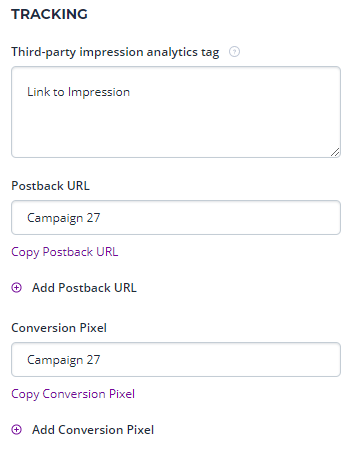
Tracking
Here, you can configure how to track users' interaction with the creatives.
Note: You can choose only one option: Postback URL or Conversion Pixel. You can always change the chosen method.
If you have third-party impression tracking, enter it into the 'Third-party impression analytics tag' field.
To set up a postback, click on 'Add Postback URL', provide a name for it, and then copy the URL from the corresponding field. Paste this URL onto the postback-tracking server side. For more information about Postback, please refer to the documentation.
To set up a conversion pixel, click on 'Add Conversion Pixel', specify a name for it, and then copy the URL from the corresponding field. Paste this URL into the
part of the code on the website page where you want to track user conversions. You need to define the conversion event (e.g., a click on a specific button on a certain page or a page visit).Whenever a user opens the page or performs an action defined as a conversion, the configured pixel will be triggered, and the user's action will be recorded and tracked.
How to set up Postback
Postback is a method of tracking conversions that relies on the advertiser's server instead of the user's browser, as pixel-based tracking does.
If you have any further questions or need additional assistance, feel free to ask!
Indeed, implementing postback tracking can be more complex compared to pixel-based tracking. However, postback tracking offers greater flexibility and ease of troubleshooting. It is recommended to use postback tracking when you have the necessary resources and capabilities to implement it effectively.
To set up postback:
Add [HASH] macro to your creative tag:
- Copy Postback URL from the Postback field on the campaign page.
-
Configure your Ad Server to send a request to DSP after conversion has been tracked. Basically, you have to define a conversion (for example, a 'Download' button on some page of your site), and when a conversion occurs, you'll track it using your ad server. Along with that, you have to get a hash from the user's cookies. Then, send a request to our DSP to complete matching the conversion. The request must contain code (URL) that you have in the 'Postback' field with [HASH] being substituted by hash that corresponds to a user impression
Optimization Rules
In the 'Optimization Rules' area, you can configure additional behaviors for the campaign to follow when specific rules are met.
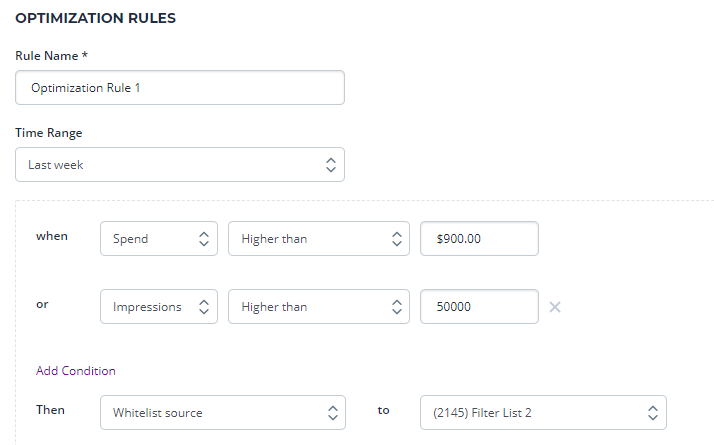
The optimization settings are as follows:
Rule Name
– the name to describe the rule.
Time Range
– the period taken into account when determining if the conditions are met can be configured in the 'Optimization Rules' area. For instance, if you set a condition such as 'Spend higher than $100', the campaign's spending over a specified period will be evaluated.
For example, if the campaign has spent $80 in the last 3 days, the condition would not be met. However, if the campaign has spent more than $100 over any consecutive 3-day period, the condition would be considered met.
This allows you to define specific timeframes and spending thresholds for optimization rules to ensure the desired behavior of the campaign.
Conditions
– (when…
You can set up to 3 conditions in the 'Optimization Rules' area. When adding a condition, you will need to determine its
type of combination with other conditions: either 'AND' or 'OR'.
If you choose the 'AND' type, the condition will be required to be true in combination with the previous condition(s)
for the changes to be applied. Conditions with 'AND' have higher priority than 'OR' conditions.
For example, if there is the following combination: condition 1 OR
condition 2 AND condition 3, then condition 2 is not enough and applies
only in combination with condition 3, while condition 3 is independent in
this context.
More simply, imagine that the ‘AND’ operator creates
parentheses around the conditions it joins together; the ‘OR’
operator does not. So, we will get the following expression: condition 1
OR (condition 2 AND condition 3).
Then the filter list to which will be added the users to whom the campaign was directed.
It can be the filter list of domains or bundles, depending on the campaign’s traffic type settings.
Note: you have to set the list in the ‘Filter List’ area of the campaign, before setting up an optimization rule.
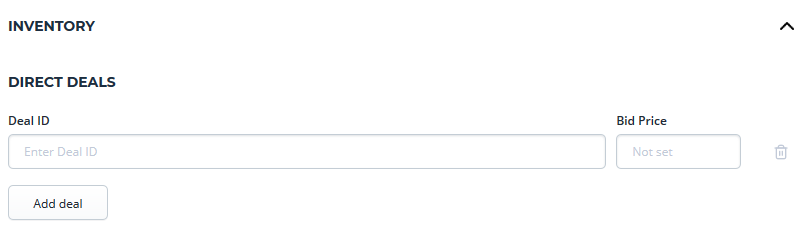
Inventory(Deal)
In the 'Inventory' area, you have the option to specify the deal if you
have established one with your supply partner.
Deals refer to the functionality that enables advertisers to purchase
ad placements directly from specific publishers through Real-Time Bidding (RTB) mechanisms.
This allows for a more direct and controlled buying process between advertisers and publishers.
Few steps to establish a deal:
*
The publisher creates a deal to sell a specific number of impressions on one of their placements. This allows the
publisher to offer a predefined package of impressions to advertisers, providing them with a dedicated allocation of ad
inventory on the specified placement.
Note:
If the publisher sets an impressions or revenue limit for the deal,
it becomes a programmatic guaranteed deal. This means that the specified
amount of impressions or revenue is guaranteed within the deal.
Once the limit is reached, the placement will then be available for trading on the open RTB market.
On the other hand, if the publisher does not set an impressions or revenue limit, it becomes a preferred deal. A preferred deal remains active until the publisher decides to deactivate it, regardless of the number of impressions or revenue it generates.
The publisher assigns a unique ID for the deal and shares it with the
advertiser they want to trade with. The advertiser needs to specify
the deal ID and set the Bid Price on the campaign page. As a result,
the campaign will purchase impressions from the specified placements
within the deal instead of acquiring placements from the open market.
Note:
ask your DSP partner manager to ensure that the DSP is connected to the
publisher's SSP. SmartyAds DSP and SmartyAds SSP are already
connected.
After saving the campaign with a specified Deal ID, the campaign will prioritize buying impressions from the specified publisher associated with that Deal ID. This means that when available, the campaign will prioritize purchasing impressions from that particular publisher before considering other available inventory sources.
By setting a Deal ID, you are indicating a preferred partnership with a specific publisher, and the campaign will prioritize buying impressions from that publisher in the specified priority order.
Note: After spending more than $10,000, you will gain the ability to select specific SSPs (Supply Side Platforms) to trade with. To do this, follow these steps:
Switch to the 'Select Sources' option. Tick the checkboxes next to the SSPs you want to trade with. Alternatively, you can click 'Select All' if you do not want to filter out any SSPs. By selecting specific SSPs, you can have more control over the inventory sources you want to trade with, allowing you to focus on preferred platforms or optimize your ad buying strategy.

Then, you may select the particular SSPs using checkboxes or a search field.
Additionally, you have the option to set the allowed percentage of fraud invalid traffic (IVT) in your campaign settings. This allows you to define the acceptable threshold for IVT, ensuring that the traffic you receive meets your quality standards.
Furthermore, you can choose to use unscanned sources. Unscanned sources refer to inventory sources that have not undergone scanning or filtering for potential issues such as IVT. By enabling this option, you can include unscanned sources in your campaign's inventory pool.
Both of these settings provide flexibility in managing your campaign's targeting and inventory preferences.
After completing the configuration of all the necessary settings, click on the "Next" button located in the lower right corner. This will take you to step 4, where you can either create a new creative or select an existing one to use for your campaign.
Alternatively, if you want to skip this step for now, you can click on the "Save" button to finish creating the campaign. You can always return later to set up and make or select creatives for the campaign.
This allows you the flexibility to complete the campaign setup without immediately finalizing the creative content, giving you the option to come back and add or select creatives at a later time.